
DAC6pro Manual

We will ensure a smooth DAC6 compliance process.

How to login

You can login to DAC6pro using a single sign-on, which is your known business credential. Enter your email address and password, then continue by clicking to get started.

If you‘re unable to login to DAC6pro, try the following troubleshooting steps:

  • Make sure that your browser is supported by TaxSuite
  • Activate your email account on Microsoft
  • Search for the sign-in button and enter your email address
  • Select “Forgot my password”
  • An email will be sent to your Outlook or Gmail account; open the email and reset your password by changing it
  • Clear your browser cache and cookies
  • Open DAC6pro and enter your login details

How to setup clients

To start working on an arrangement, you will first need to create a client. If you are using DAC6pro in a multi-national capacity, please note that client(s) may also be interpreted as subsidiaries or business units. Every client represents a data repository, meaning that only users with access rights can access a particular client’s data.

Create a client by:

  • Select + ADD CLIENT
  • Enter the client name which is used as an internal reference
  • Enter the client reference number which is used as an internal reference, i.e., in other software systems
  • Enter the client contact, who is typically the person representing the customer
  • Select Save client

If there is a client that you wish to edit, select the pencil icon to make the relevant amendments.

If you need to create an arrangement but you cannot find the client, please explain this matter to your DAC6 Champion or someone with Client Admin rights. It might be that you need the appropriate client access to view that client.

If you are new to DAC6pro and wish to bulk import your clients, please contact your TaxModel Sales Representative.

How to create users

If you have the user admin permission in your DAC6pro account, you can create new users, customize the user role permissions, and remove users or specific clients from your workspace.

Add users

  • In your DAC6pro account, click the menu icon (three dots) in the top right corner of the navigation bar
  • Click on User management
  • Create a user by selecting + ADD USER
  • Enter an email address and select “add user”
  • An automated email invite will be sent to the user

Grant client access and user roles

Whenever a user is created, the user must have client access and, at least, the arrangement creator right to allow the user to create and manage arrangements in DAC6pro.

  • In DAC6pro, in User Management, select the user you wish to grant client access and/or user roles
  • Open Client Access, then select the “clients” tab, and select or deselect the relevant client checkboxes
    • Select all when a user should be allowed access to all clients
    • You can choose to Assign new clients to this user automatically by checking the box; this is relevant when a user should have access to all current and future clients in DAC6pro

Now you can assign user roles to the user. If you want to know the definitions of every user role, please read the User Management Article.

  • Open User Roles (next to Client Access), then open the “user roles” tab and select or deselect the relevant user role. Keep in mind that each user role is unique and will allow a user to perform specific actions. Read more about the User Roles here.

After a change is made in Client Access and/or User Roles, please save the change by selecting Save Changes.

If you are new to DAC6pro and you wish to bulk import your users, please contact your TaxModel Sales Representative.

Add viewers

If you may need to involve an external party – typically, a tax authority, client or, in some situations, a third-party intermediary.

To be sure that you restrict the viewer accounts from access to information about client and arrangement levels, complete the following steps:

  • Open User Management
  • Create a user by selecting + ADD USER
  • Enter the email address and select “add user”
  • An automated email invite will be sent to the user
  • Select the user you have created
  • Open Client Access, then grant user access to the relevant client
  • Open User Roles and deselect any active user role, as the viewer should be restricted from any user roles
  • Select Save Changes

If you wish to add the user as a viewer for a specific client and arrangement, you can open the client, then when you create a new arrangement or edit an existing arrangement, you can select the user as a viewer. The viewer can only see the relevant arrangements. Please note that viewer rights will allow a user to view the arrangement data and to leave comments at specific sections in the arrangement

Remove users

  • Open User Management
  • Select the user you wish to delete
  • As the action, select the trash bin
  • Select YES, REMOVE PERMANENTLY

In the top right corner of your screen, the following message will be shown: User successfully deleted. If there is an error message, this might mean you do not have the user admin role.

How to manage arrangements

If you have the arrangement admin right, you can view all arrangements for a selected client. If you do not have the arrangement admin right, you can only view the arrangements that are assigned to you.

When you select Arrangements in the top navigation bar, you will be redirected to an arrangement overview of the selected client. The arrangement overview is structured like a dashboard. It allows you to view the arrangement name, reporting date, last modification, involved countries, and the status of an arrangement.

There are multiple arrangement statuses:

  • Initiated – the arrangement is created, but no assessment has yet been made
  • Preparing – the arrangement is being prepared
  • Reviewing – the arrangement is under review
  • Approved ready to be reported by other – the arrangement has been finalized and can be reported by another user
  • Approved not reportable – the arrangement has been finalized and based on the facts and circumstances it is deemed not reportable
  • Ready for reporting by us – the arrangement is made available for reporting
  • Bundled – the arrangement has been exported in XML

If there is an extensive list of arrangements, you can increase the number of arrangements that are listed, or use the search function to find and open the relevant arrangement by entering the arrangement name or internal reference.

If you are an arrangement admin, you can edit any arrangement by:

  • Clicking on the three dots as Actions
  • Select Edit, if you wish to edit the arrangement name, or to add/delete the preparers, reviewers or viewers
  • Select Revert if you wish to change the status and make amendments
  • Select Remove is you wish to delete the arrangement – please note that the deletion is limited to specific statuses, to safeguard the existence of active arrangements
  • Select History if you wish to view the history of an arrangement

How to create an arrangement

You can create and manage all cross-border arrangements in DAC6pro. New arrangements should be created when you are working on an arrangement that involves at least one EU Member State. It is possible to work together with colleagues and other involved parties, or to complete the process by yourself.

If you have the arrangement admin and/or arrangement creator permission in your DAC6pro account, you can create new arrangements.

Creating arrangements

  • Make sure to select the relevant client, by check this information in the top right of the navigation bar and in the center of your screen
  • Select + ADD ARRANGEMENT at the bottom right of your screen
  • Enter the arrangement name used as an internal reference
  • Enter the preparer‘s email address:
    • A preparer completes the initial DAC6 analysis through identifying the involved countries, summarizing the arrangement, adding document information about intermediaries and relevant taxpayers, and when necessary completing the hallmark assessment
  • Assign the reviewer(s)
  • Enter the reviewer‘s email address:
    • A reviewer reviews the initial DAC6 analysis through completing the steps and can communicate with the preparer, to stay aligned on new decisions and sign off the arrangement

You can add single or multiple preparers and reviewers for any arrangement. If you want to assess and report the arrangement by yourself, you can select your email address as the preparer and reviewer. Instead of completing the preparer workflow first and the reviewer workflow second, you will then be able to complete the preparer and reviewer workflow in one go.

  • Optionally, enter the email address of a single or multiple viewers:

A viewer can view the arrangement data and leave comments by using the chat functionality

How to prepare an arrangement

If you are assigned as a preparer you can open the arrangement to start the preparer workflow, the DAC6 assessment, and complete preparations for the arrangement filing

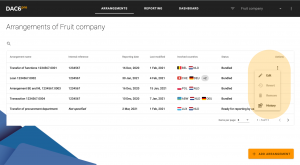
In the top navigation bar, you can find information about the following: the arrangement you are working on, reporting deadline date, last modification date, and the status.

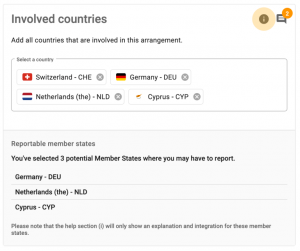
The menu on the left will extend if it appears that the arrangement is cross-border and no tax types are applicable. You can use the menu to swiftly navigate to other sections of DAC6pro.

Please note that the icon will provide access to the DAC6 knowledgebase; here, you will find general DAC6 interpretations, explanations, and deviations in the national legislation. In each section, this icon is available to support you in your decision-making process.

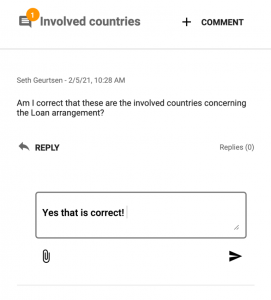
Next to the knowledgebase, you will find the chat functionality. Click + COMMENT to raise a question and initiate a dialog with the stakeholders in an arrangement. You can also use the chat function to store proof of your notification or to time stamp your report inquiry. Select the paperclip icon if you wish to store certain documents. Every comment and file is stored at the section level, i.e., the comments made in the Involved countries section are stored in that section.

If you have selected the wrong arrangement for the assessment, click on Arrangements, in the top menu next to Reporting and Dashboard, or navigate to the arrangement overview by clicking on the DAC6pro logo.

Everything you enter will be automatically saved in your DAC6pro account. Every section, i.e., each step/question, is a DAC6 reporting requirement and will be exchanged with the tax authorities. It is therefore necessary to provide information for each required field, if available. Once you set the “Disclosing country”, the system will automatically update itself in line with the Tax Authority‘s XML schema and will inquire about additional data, when necessary.

+ COMMENTS and + EXPLANATIONS are only used for internal purposes and are never included in the XML or PDF export.

How to complete Setup

Checking cross-border and indirect tax types.

  • Involved Countries

Enter the relevant EU Member States and the other countries involved with regard to the relevant taxpayers and intermediaries involved in the arrangement.

Once you have set the involved countries, the knowledgebase will automatically update with relevant information concerning the requirements in those countries.

  • Tax Types

Determine whether there are in-direct tax types applicable. If yes, select “applicable”; if not, select “not applicable”; and if you need to gather more information, select “not determined”.

Click CONTINUE to go to Refine.

*If there is one involved country, you can close and store the arrangement by finalizing the assessment

**If one tax type is applicable, you can close and store the arrangement by finalizing the assessment

***If you still wish to continue and report the assessment, you can mark it as reportable

How to complete Refine

Gather and enter the following reportable information about the arrangement and its stakeholders:

  • Disclosure name
    Enter the name by which the arrangement is known.
  • Description
    Enter a summary of the arrangement and an adequate description of the relevant business activities.

*If you need to complete the report in multiple languages, select +,  and then add the appropriate language. You can use a total of 4,000 characters to describe the arrangement.

  • Implementation date
    Select the date when the first step was made by your organization.
  • Reporting date
    Select the date for filing the XML report. DAC6pro will suggest an appropriate reporting date based on the filing period.
  • Intermediaries
    Identify and add the intermediaries involved in the arrangement.
    • Select + INTERMEDIARY to enter and save intermediary information.

*If available, enter the names, TIN, and the place of tax residence

**Intermediaries that you create are automatically stored and can be selected in new arrangements

  • Right of privilege
    If applicable, add a right of privilege by checking this box.You can store proof of your notification to stakeholders by opening the audit trail, i.e.,  paperclip, upload a snapshot or file and leave an audit note to bulletproof the audit trail. You can think of this as a type of timestamp.
  • Lead intermediary
    This section will pop-up when multiple intermediaries are involved.
    • Select the lead intermediary by determining the primary intermediary, i.e., Promotor – Designer – Implementation
  • Relevant taxpayers
    Identify and add the relevant taxpayers involved in the arrangement.
    • Select + RELEVANT TAXPAYERS to enter and save the relevant taxpayer information.

*If available, enter the names, TIN, and place of tax residence

**Relevant taxpayers that you create are automatically stored and can be selected in new arrangements

  • Agreeing taxpayer
    This section will pop-up when there is no lead intermediary involved.
    • Select the taxpayer that has initiated and agreed to the arrangement.
  • Disclosing person
    Select the person or organization that will disclose the potentially reportable cross-border arrangement

*DAC6pro will provide you with data-driven suggestions, but you are free to overwrite these suggestions

  • Capacity disclosing intermediary
    If the disclosing person is an intermediary:

    • Select Designer/Promoter/Implementation if the intermediary is a primary intermediary.
    • Select Service Provider/Assistant if the intermediary is classified as a secondary intermediary.
  • Capacity disclosing taxpayer
    If the disclosing person is a taxpayer:
    • Select PROFFESIONAL SECRECY OF INTERMEDIARY if the intermediary involved has invoked the right of privilege
    • Select INTERMEDIARY IN NON-EU COUNTRY if the intermediary involved has its place of tax residence outside the European Union.
    • Select IN-HOUSE ARRANGEMENT if the arrangement is internally designed and made ready for implementation.

Status disclosing person

  • Intermediary nexus
    If the disclosing person is an intermediary, determine and select the applicable nexus.
  • Taxpayer nexus
    If the disclosing person is a taxpayer, determine and select the applicable nexus.

Disclosing country

  • Disclosing country
    Enter the Member State where the disclosing person has an obligation to report
  • Exempt countries
    Enter the Member State where the disclosing person is exempt from the obligation to report
  • Audit trail
    For internal purposes, you can upload and store any relevant document in relation to the arrangement. DAC6pro will accept any type of input file. This might be relevant in the case of receiving an audit from a tax authority.

Click CONTINUE to go to Hallmarks.

How to complete the Hallmarks assessment

Hallmarks EU

To avoid spending time selecting the applicability for each hallmark, all hallmarks are automatically set at “not applicable”. Keep in mind that you will still need to assess whether a hallmark is applicable or not applicable.

  • Main Benefit Test
    If the main purpose of the arrangement is to obtain a tax advantage, select YES, MAIN BENEFIT TEST IS SATISFIED.If it is uncertain whether a tax advantage is the main benefit, select

NO, THE MAIN BENEFIT TEST IS NOT SATISFIED.

  • Hallmarks Category A, B, C, D and E
    You can find relevant information concerning the hallmark by clicking the I icon and gain further information before making a decision.Select Applicable if the arrangement fulfils the hallmarkSelect Not applicable if the hallmark is not satisfiedSelect Not determined if it is not certain whether the arrangement fulfils the hallmark features. The arrangement reviewer will then be notified about the hallmark decision once you have finalized the preparer assessment.

*Optional Select + ADD EXPLANATION

Leave an explanation if you wish to inform the reviewer and the arrangement stakeholders about the rationale behind a decision.

Click CONTINUE to go to Enrich.

How to complete your preparer assessment

  • Sign off
    Enter your name and the appointed arrangement reviewer will receive an automated email.

How to review an arrangement

If you are assigned as a reviewer, you can open the arrangement to start the reviewer workflow in the DAC6 assessment.

In your mailbox, you will find a DAC6pro email containing a request to review the arrangement. After selecting the link, you can start your review right away.

  • Review Setup
  • Review Refine
  • Review Hallmarks
  • Review Enrich
  • Sign off
    Select READY FOR REPORTING BY US if the reportable cross-border arrangement is ready to be exported in an XML format.Select APPROVED, REPORTED BY OTHER if you want to finalize and audit trail the reportable cross-border arrangement

Enter your name to FINALIZE.

How to report an arrangement

If you have the arrangement reporter role in your DAC6pro user account, you will see the reporting tab in the top navigation bar and will be able to generate XML files.

Reportable arrangements
Every reportable arrangement is listed and segmented according to each country.

  • Select REPORTING in the top navigation bar, which is next to Arrangements
  • Select the required country
  • Select multiple or single arrangements
  • Select GENERATE FILE in the bottom right corner

Generated files
You can view and download all historic XML files

Re-open an arrangement with the Bundled status
If you want to change the data for a bundled arrangement, i.e., an arrangement that is already bundled in XML, you can reopen the arrangement by clicking the Revert icon. If suitable, you can enter a comment to provide a clarification about why you want to reopen the arrangement. You can now access the arrangement in the arrangement overview.

Deadline monitoring

If you have the arrangement reporter role in your DAC6pro user account, you will see the Dashboard tab in the top navigation bar. You can use the tab to track deadlines and get a sense of your overall compliance position.

  • Select DASHBOARD
  • If there are multiple clients, you can filter the client by opening ALL CLIENTS

You can then select and deselect clients to get a filtered view

  • *If you would like to suggest an improvement, please complete a ticket

How to setup DAC6 enforcer (add-on)

If your DAC6pro account has permission to DAC6 enforcer, you can activate DAC6 enforcer and send a bi-weekly survey to other users.

Activate DAC6 enforcer


  • Open the menu in the top right corner
  • Select DAC6 enforcer
  • Select the users you wish to include in the survey
  • Select DONE

Selected users will receive an email bi-weekly in where the user provided information about:

“Did you add any arrangements to DAC6pro?”

Answers may be:

  • Yes
  • No
  • Don‘t know
  • Not entered

You can analyze the responses from your user group.

  • Select DASHBOARD
  • In the left menu, select “enforcer”
  • You can filter by data or select a survey round to review the results

Service Desk

Release notes

If you want to know about the new features that are continuously being developed and implemented, you can read more about the latest updates in “Release notes”.

  • Open MENU, in the top right corner
  • Select Release notes
  • Click “read more” if you wish to read the entire article

How to report a bug

If you experience any flaws in the workflow, or you cannot continue:

  • Open the MENU in the top right corner
  • Select Help Center
  • Select Report a bug
  • Select the relevant priority level in relation to your need for support
  • Select DAC6pro as the component
  • Enter a brief summary of the problem you are experiencing
  • Enter in a step-by-step manner the actions you performed leading to the current problem
  • Enter any details about the action you cannot perform right now
  • Optional: Attach a snapshot, as this will greatly improve the support service
  • Click Send

Your ticket will be created and you will soon be contacted by one of our Customer Support staff. During business days, we promise to respond to you within 24 hours.

What we cannot support

  • If you are experiencing problems regarding DAC6pro usage  practices, please check first with your internal DAC6pro champion.
  • If you cannot see a client, you might need to inquire about the client access, which can be granted by a client admin.
  • If you cannot create an arrangement, you might want to inquire about the arrangement admin and/or arrangement creator right with a user admin.

How to suggest an improvement

If you would like to improve your DAC6pro product experience, you can suggest an improvement as follows:

  • Open the MENU, in the top right corner
  • Select Help Center
  • Select Suggest improvement
  • Enter a brief summary of your suggestion
  • Select DAC6pro as the component
  • Describe the suggestion
  • Optional: Attach a flowchart or file, as this will improve the support service
  • Click Send

Your ticket will be created and you will soon be contacted by one of our Customer Support staff. During business days, we promise to respond to you within 24 hours.